
Have you scrolled through the popular Instagram feeds and wondered how in the world they keep their images and aesthetic so cohesive and consistent? Well I sure have, and I have spent more time than I would like to admit trying to figure it out and the answer is so much easier than I expected- PRESETS!! Yep, using some simple photography guidelines, anyone can have captivating images (even from your phone) with the click of a button.
If you think this sounds too good to be true, go ahead and take a peek at my instagram and scroll down. You will see a very distinct change from the time I wasn’t using a preset and when I started to. Keep reading to find out which preset is my go to and other popular ones your favorite accounts are using. I am including presets that match any mood or look you are going for, and at the end of this post I will show you how I edit my photo with my preset of choice! *I just want to note that I am not affiliated with any of the presets I am mentioning and am providing this information with no monetary gain. I am simply sharing with the hopes this can help someone save some time and take great photos.
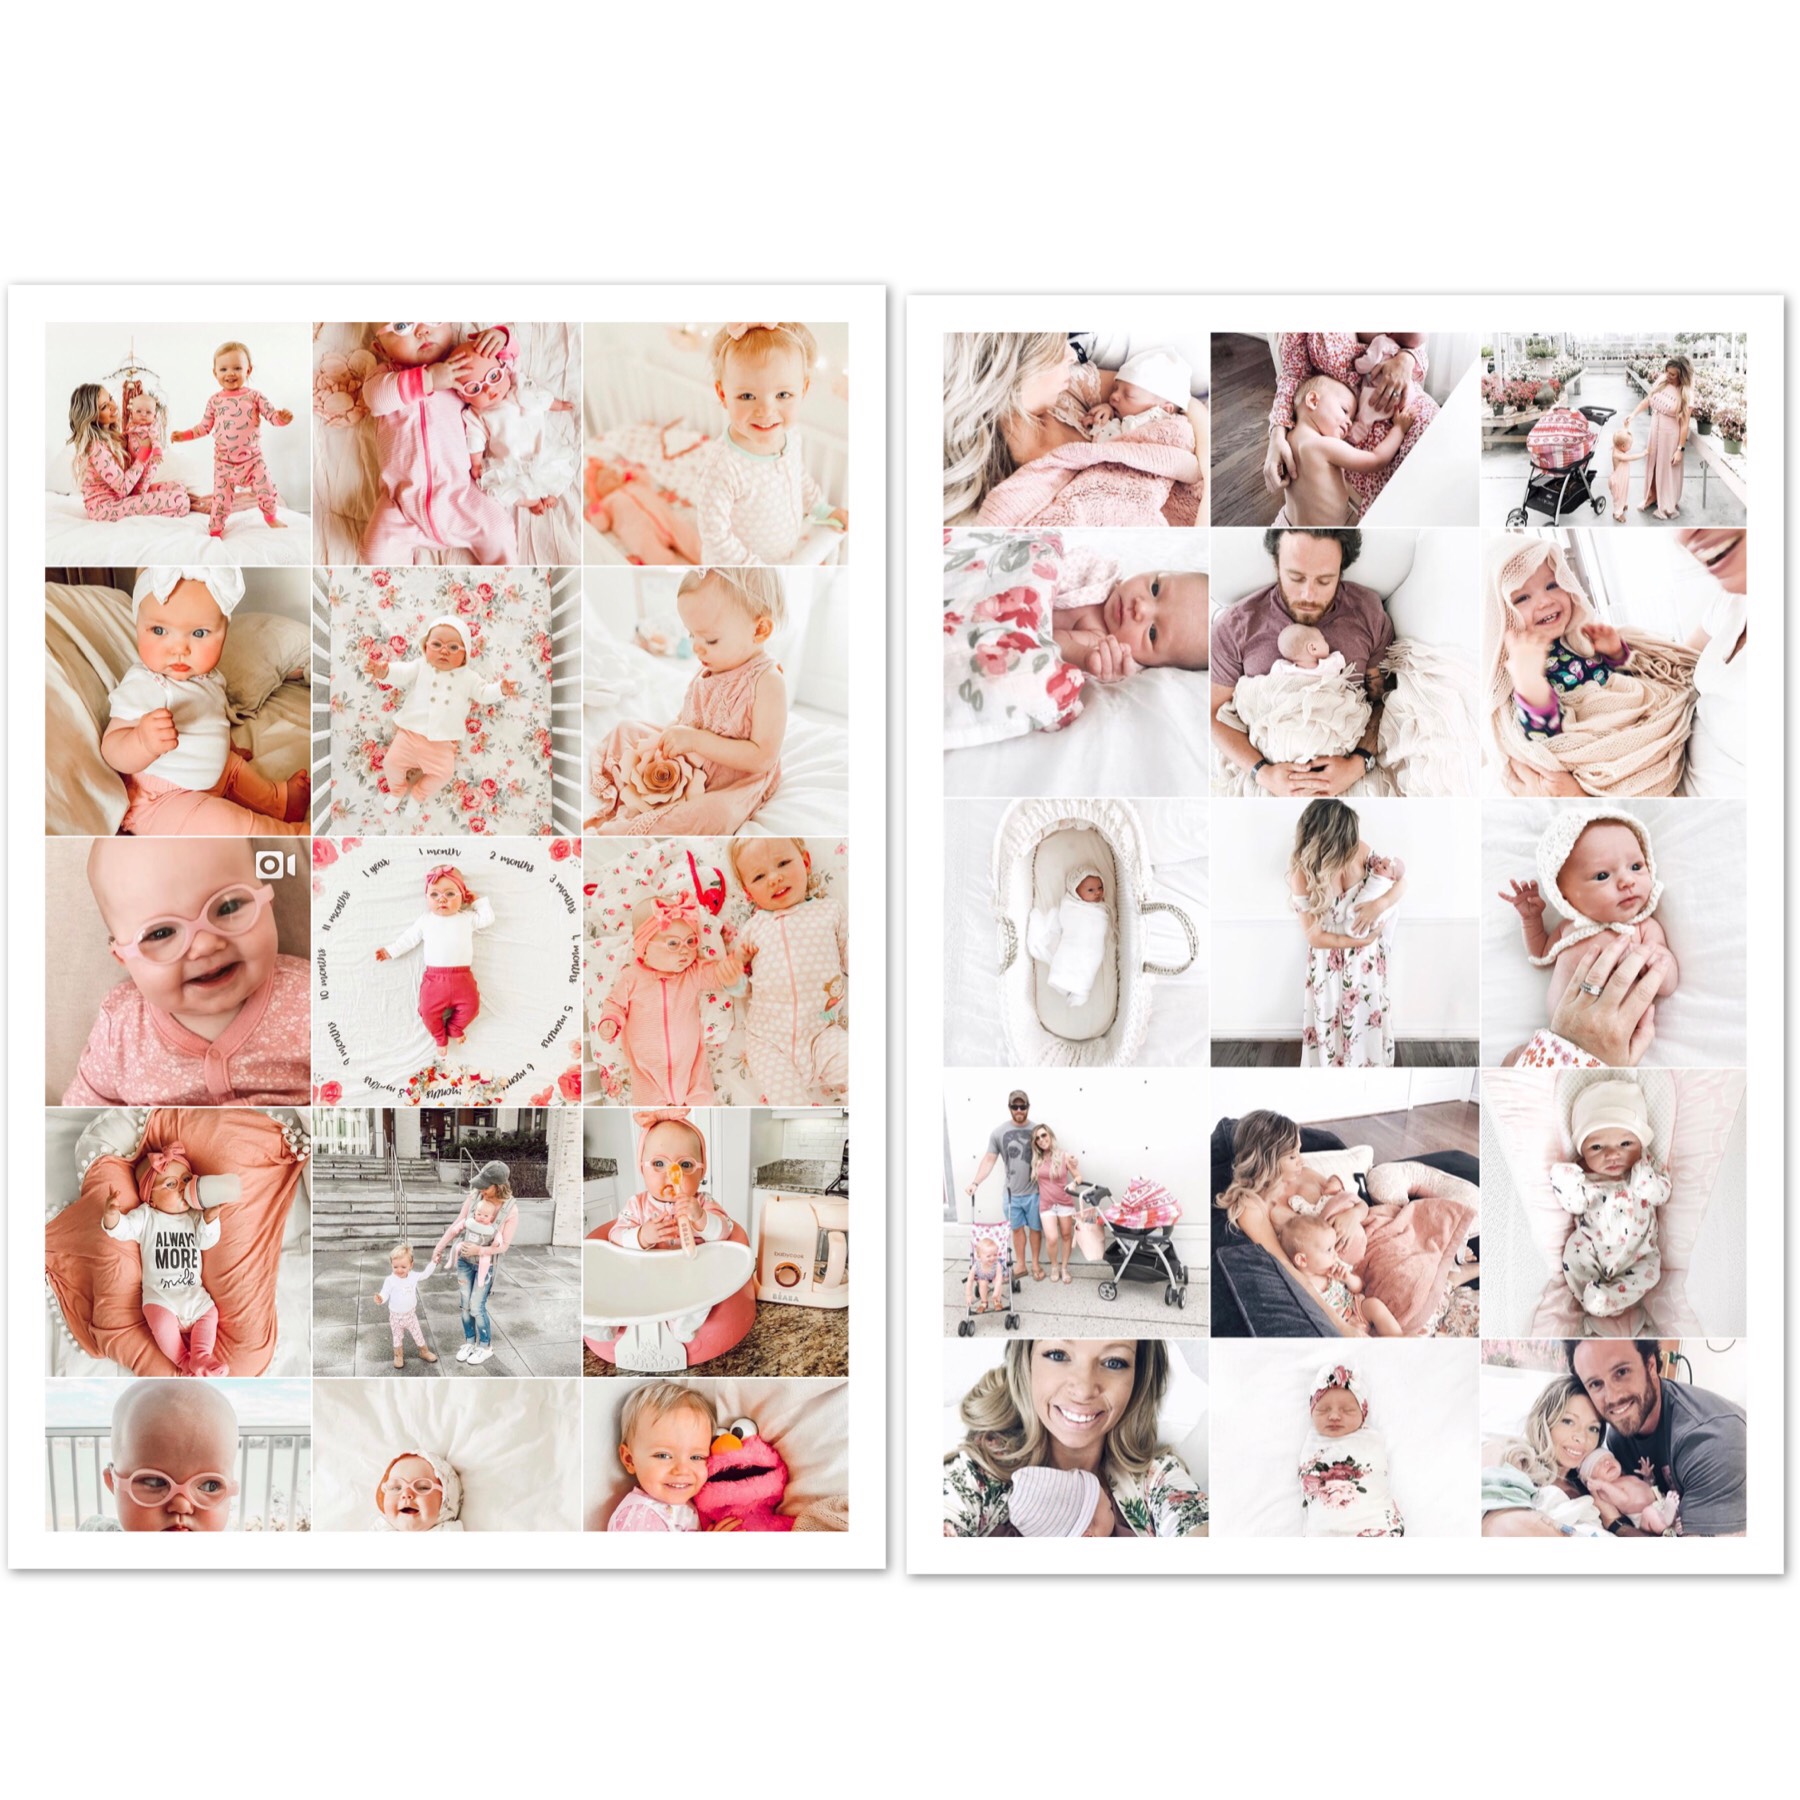 (Photo on the left is using a purchased preset and tutorial at the bottom of this post. Photo on the right is using manual editing tips. I do have a tutorial of how I used to edit my photos in the second picture. You can view that here.)
Before we get started on applying presets, here is a general list of guidelines to help your images and feed pop:
- Shoot in natural light. This helps create beautiful white balance and skin tones.
- Avoid harsh shadows and direct harsh sunlight. Try to find a fun shaded area outdoors if it’s a midsummer day with no clouds.
- Use consistent colors in your images. As you can see, I try to have pops of pinks in almost all of my photos which helps give my feed an overall pinky appearance.
- Take clear images and post only your best content. You don’t necessarily need a fancy camera to make beautiful images. A majority of my feed is shot on my iPhone. As long as your photo is clear and your content is purposeful, your can have explore-page-worthy photos!
- Keep your background decluttered but include interesting details. Clutter is bad and draws attention away from your subjects. That doesn’t mean you have to only shoot on white backdrops either. I love feeds with interesting floral touches and organized home decor in the background!
- Be yourself and have a clear message. I will say the one small issue with presets is that your content can have a similar aesthetic to someone else (which, lets face it, that’s instagram no matter how you choose to edit), so it’s important to set yourself apart from your followers and show your own unique brand. Have your own voice and message and be loud & proud about it. Your photos will get a follower’s attention, but your content and personality is what is going to keep them coming back for more.
Presets
Why I love them: these are great for even the most novice photographer and are FAST. My photos are taken, edited, and scheduled to post in often as little as 5 minutes! (Note- I do not use a purchased preset for my professional photography business.)
The drawback: you’re going to have to pay. BUT you get what you pay for and for me that is an expertly crafted preset, a beautiful feed aesthetic that is cohesive and fits my personality, and, the most important one, TIME!
If you are looking at changing the overall feel of your feed and trying to take your instagram to the next level, I truly think these are a game changer. Bonus- if you are making your instagram a business, you can write these off in your taxes as business expenses!
*You will need Lightroom in order to use the following presets
*You can use these presets on your phone, which is what I do through the Lightroom App, but in order to do so you will need to follow this tutorial that I found to help me!
I think we all can agree that Tezza has one of the dreamiest Instagram accounts out there and she has created beautiful presets that are among the most common presets used on popular instagram accounts. These presets produce beautiful & rich color tones with amazing detail clarity.
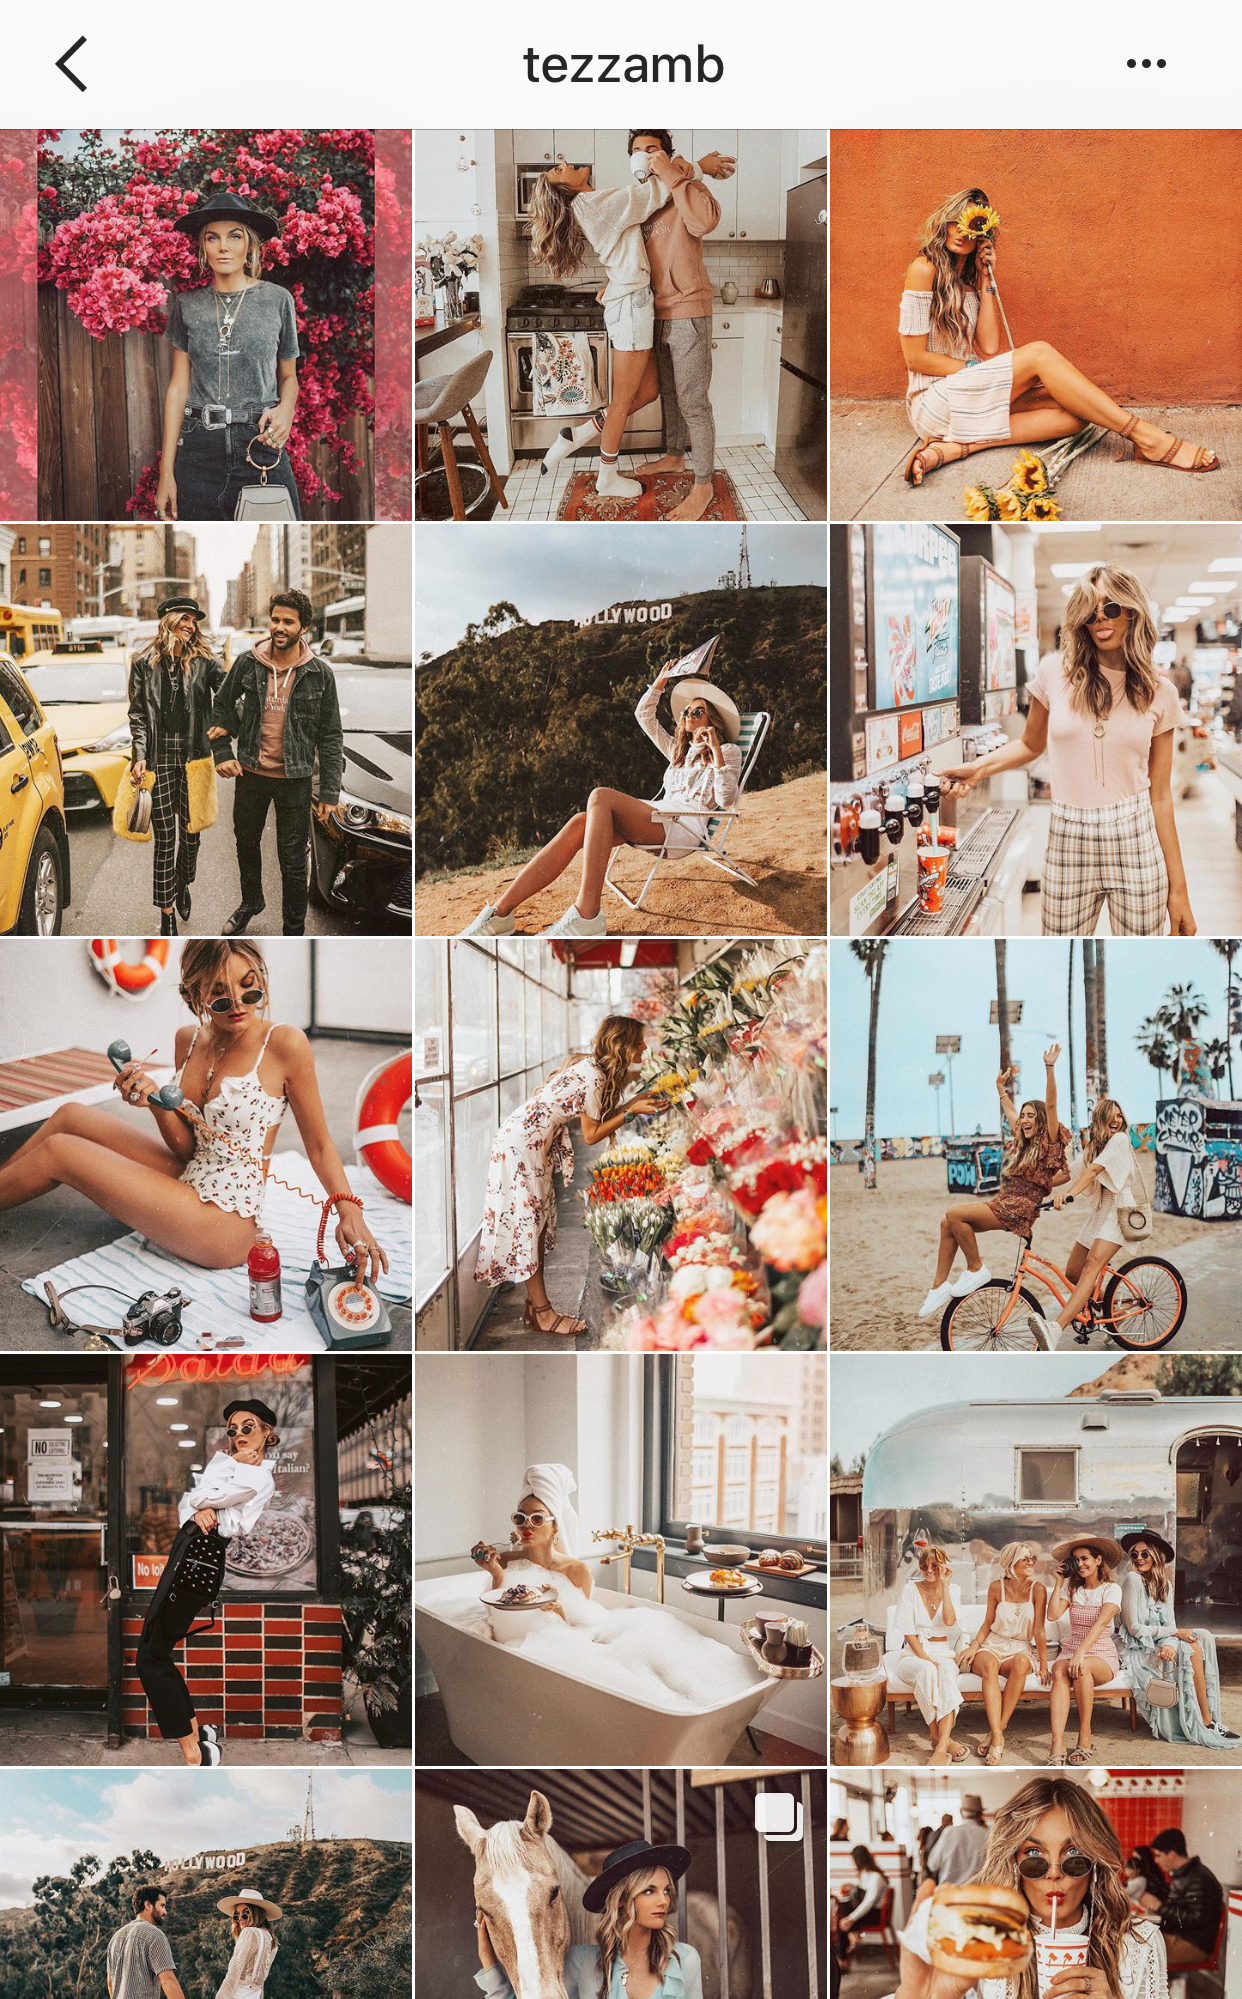
I LOVE her TZ04 preset and it is sold individually.
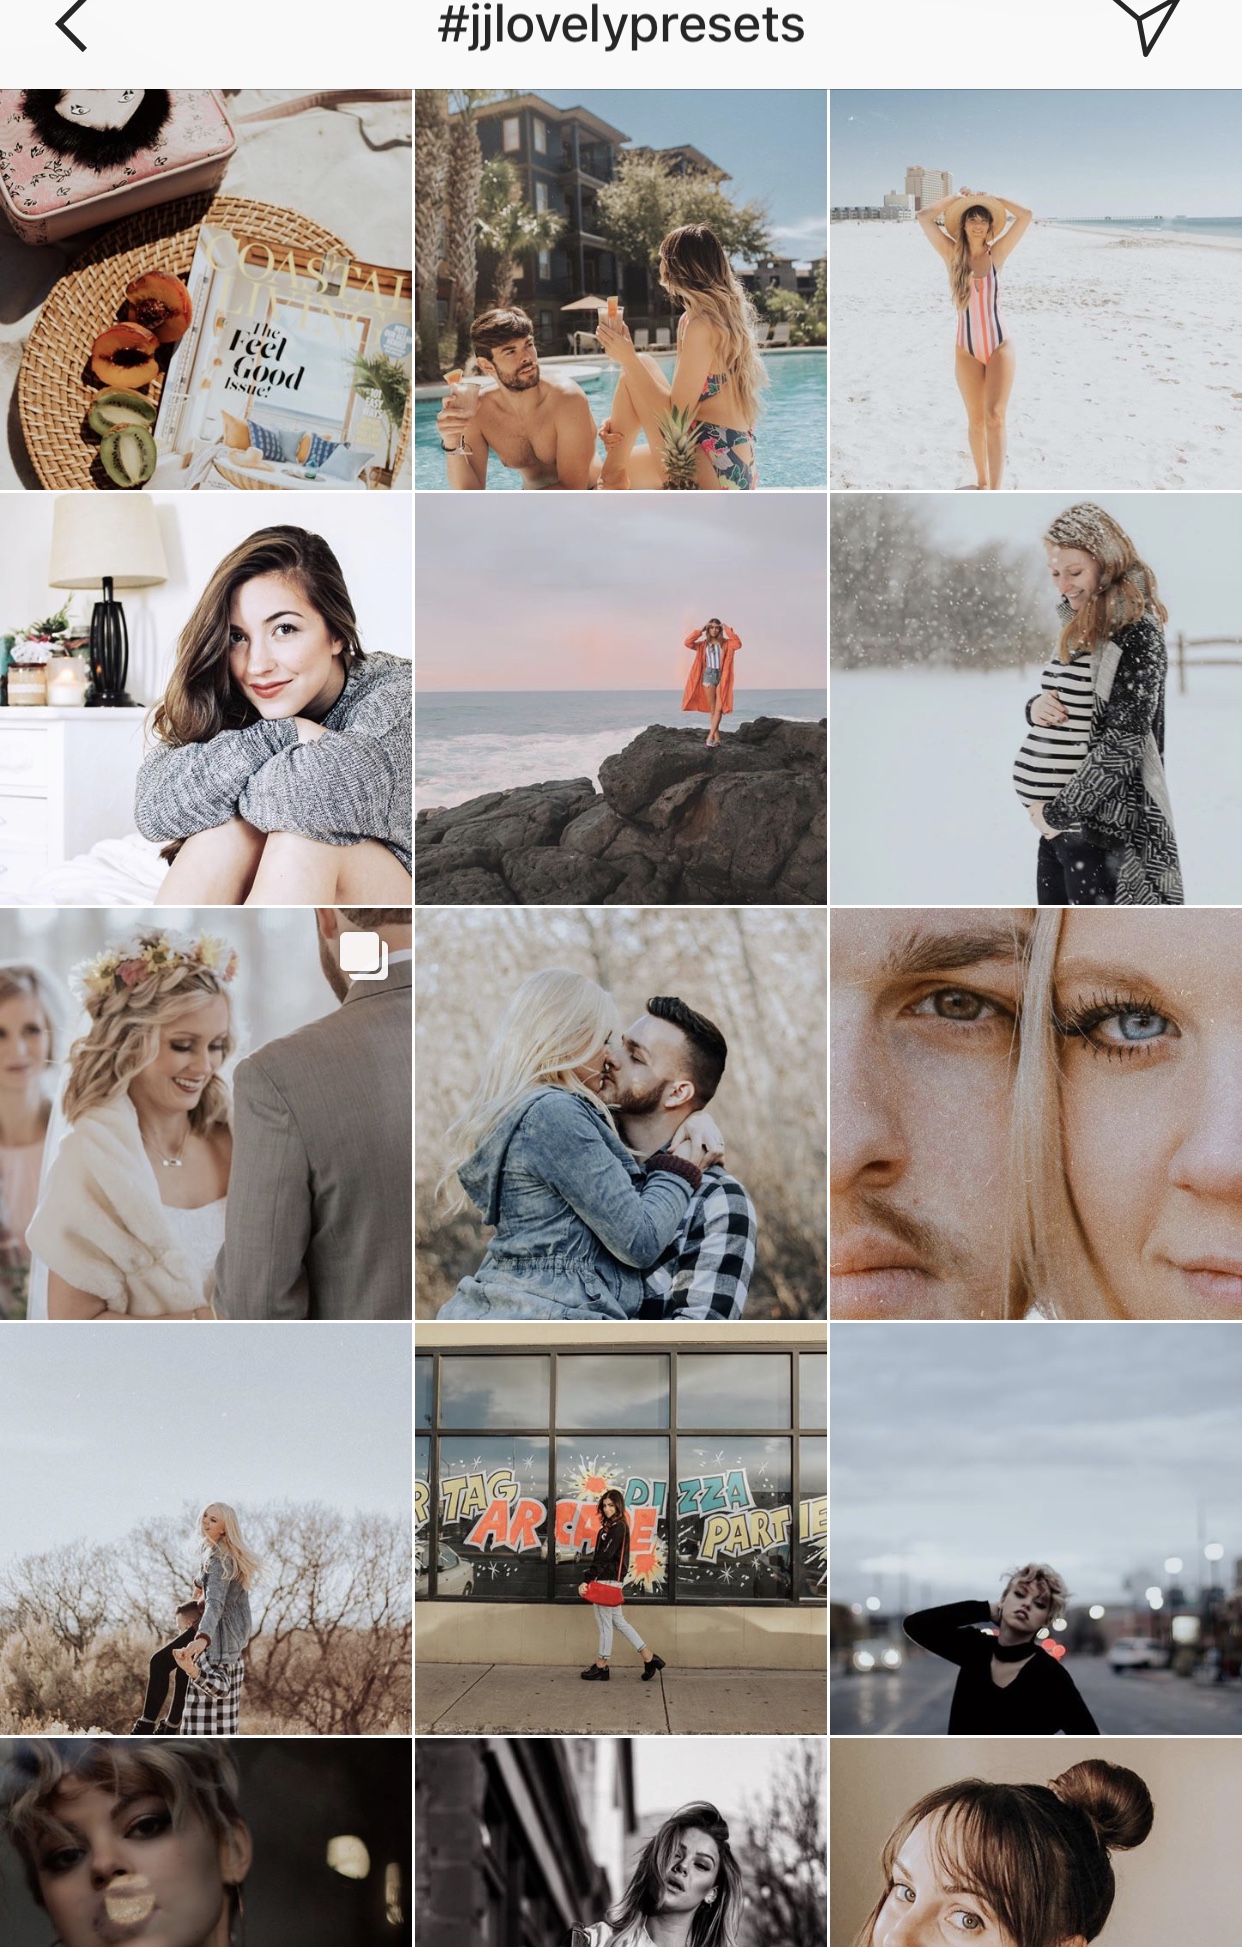
Jessica Janae Photography Presets
Jessica is one of the kindest photographers I have met and she has a real passion for helping others achieve beautiful images. She has created two very popular (and affordable) preset packages: JJ Lovely & JJ Signature .
If you love feeds with very “soft, pretty, warm, & pastel” color palettes, then JJ Lovely is the perfect fit for you. When I have used these presets, I have hardly had to tweak a thing. She really couldn’t have named them better because you really do look at photos in the screenshot below with #jjlovely presets and think, “Awww how lovely & darling!”.
If you are drawn to feeds that are moody & romantic, then I highly recommend the JJ Signature pack. I have not found a lighting situation that these don’t work awesome in! You can see the versatility in the screen shot below of the search results for #jjpro.

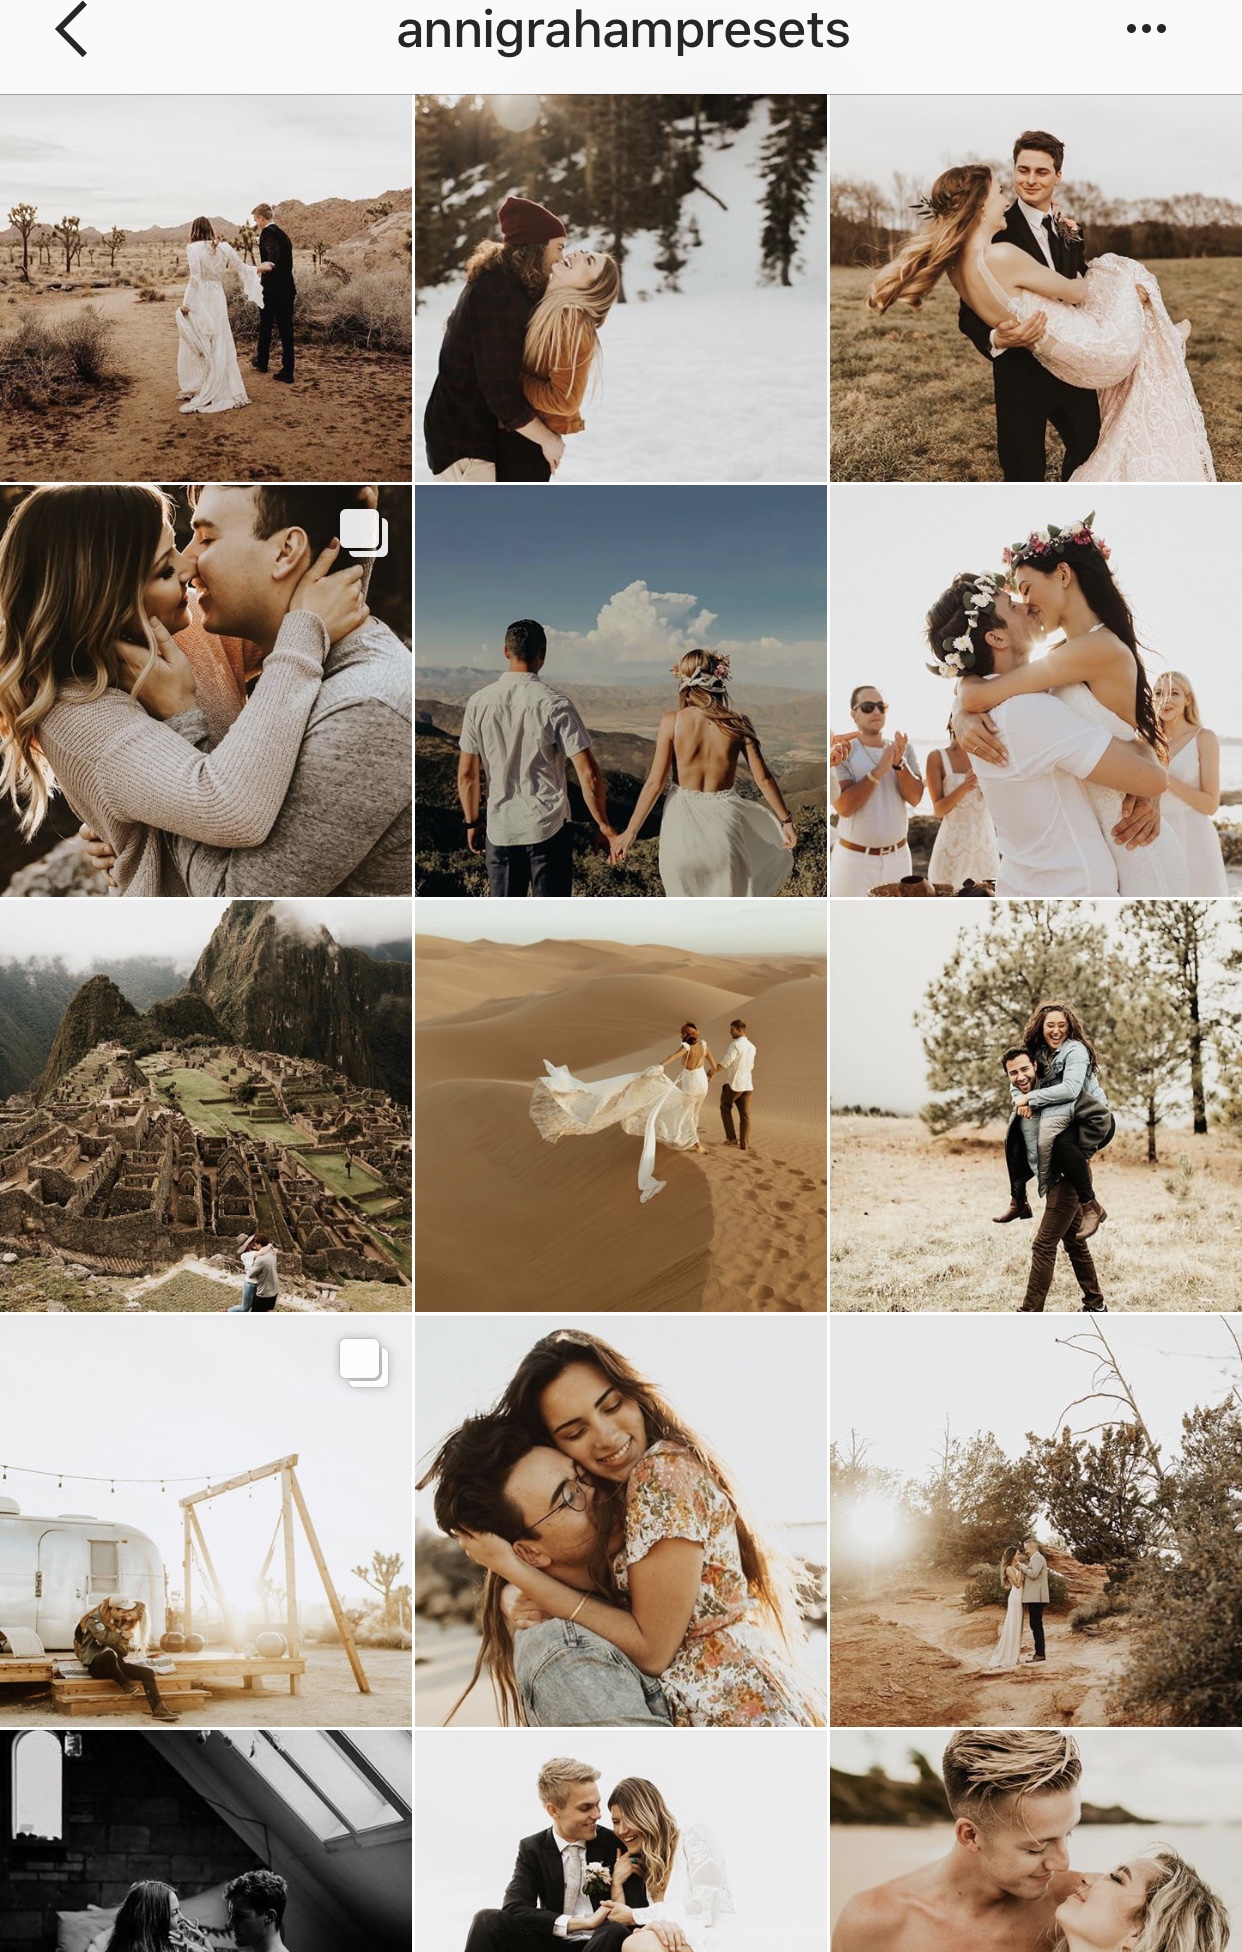
Oh Anni, these presets are probably the most captivating and spellbinding ones I have found. While it is not my personal editing style or aesthetic, it is one that I am consistently drawn to. To me, when I see a photo styled to the likes of Anni Graham presets, I think of storytellers. I think of well thought out light and romantic elements. Ah, I could go on because they are just so dreamy but I will just let you see for yourself.
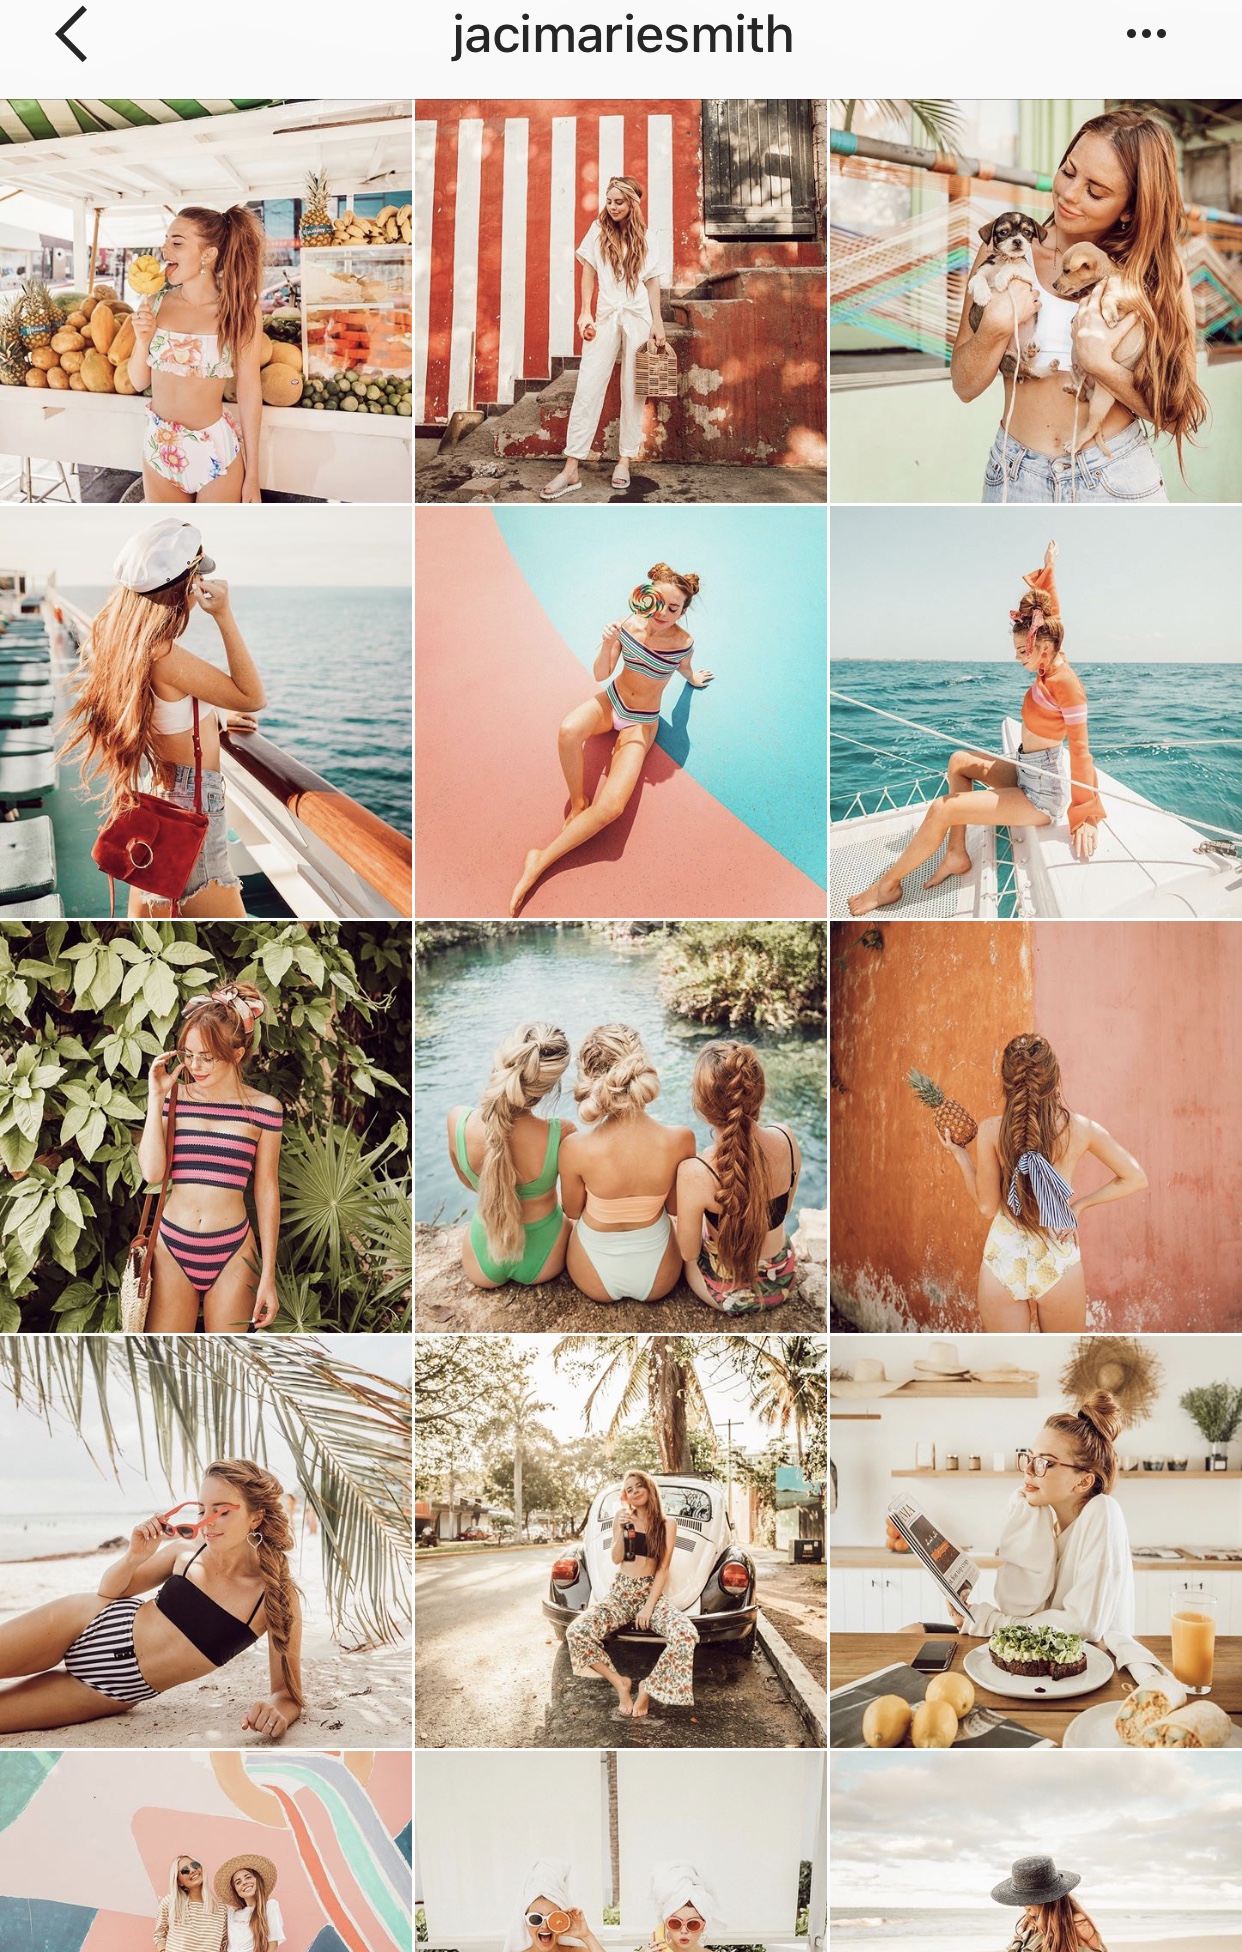
And now… the one you have been waiting for… the MECCA… my go-to editing preset:
Where do I even begin? I ADORE Jaci and her feed, and her photography drew me in IMMEDIATELY. It is so creamy, so warm, so rich, and just really translates well with my personal editing style for Instagram. It took one scroll through the #jacimariepresets hashtag results to know this was the direction I wanted to take with my feed.
Step-by-step Editing
So here is the lovely thing about presets- there aren’t many steps! The presets come with instructions on how to install them on to your desktop Lightroom which is the first thing you will need to do. Then here is how I edit. For CLOSED CAPTIONING, please click the CC in bottom right hand corner of video.
For desktop computer:
- Open Lightroom
- Upload image to edit
- Using the preset menu on the left hand side of screen, select desired preset. For me this is the Jaci Marie Cool preset
- Adjust exposure, warmth, and contrast to your liking
- Depending on the photo, I usually use the color tool on the right hand side of the screen to take the orange tones down just a bit (they can be a little intense in some lighting situation with this app but its an easy fix on lightroom)
- Download image and share
For mobile device:
- Open Lightroom app
- Upload image to edit
- Find the quick collection where you have saved your presets and click on the desired preset. Make sure the cloud in the upper right hand corner loads from blue to white (see video for example)
- Go back to main photos menu and find target photo to edit (be careful not to click on any other photos in order to keep the preset settings copied)
- Once your photo is pulled up to edit, scroll to “Previous” on the bottom menu and click “All from previous”
- Adjust exposure, warmth, and contrast to your liking
- Depending on the photo, I usually use the color tool on the right hand side of the screen to take the orange tones down just a bit (they can be a little intense in some lighting situation with this app but its an easy fix on lightroom)
- Share!
That is it guys! I hope this was helpful! Again, this was an unsponsored blog post that was written to help my homies on the gram out! Return the favor and do a solid but turning on post notifications for us and engaging with our page! As I mentioned in a recent post, it really DOES make a difference and your efforts help me to stay at home and take care of Charly’s additional needs! Not to mention, I just really do LOVE hearing from you guys and connecting. So from the bottom of my heart thank you!